Description
This article explains how to configure a GIS service that you can use with your applications to provide a geographical representation of information.
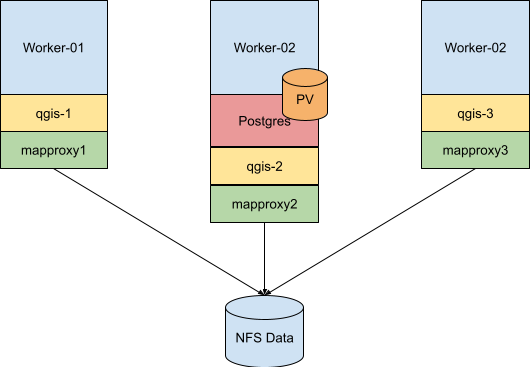
This article assumes that we already have a kubernetes cluster configured. If you don’t have it, you can refer to configuring kubernetes article or use a preconfigured one.
In the above diagram we can see several components:
- a Postgres database with the postgis extension installed that can hold geographic data
- we will configure a physical volume on “worker-02” that will always associate the database with that node
- QGIS – a WMS service that can use the geographical data and render tiles(images) on request
- Mapproxy – a caching server that can store on-the-fly or seeded request tiles
All code can be found here.
Configuration
Step 1
At this step we will configure a namespace for the project and we will create a folder on one of the worker nodes that will be used to define an affinity for the Postgres container.
# create a namespace for the project
sabin@sabin-pc:~$ kubectl create namespace gis
namespace/gis created

# configure the physical volume for postgres
sabin@sabin-pc:~$ ssh k8suser@10.17.2.2

k8suser@worker-02:~$ cd /static-storage/

k8suser@worker-02:~$ mkdir postgres-qgis-data

k8suser@worker-02:~$ exit
Step 2
Create a storage class that states we will use local files, with no provisioning.
apiVersion: storage.k8s.io/v1
kind: StorageClass
provisioner: kubernetes.io/no-provisioner
reclaimPolicy: Delete
metadata:
    labels:
        app.kubernetes.io/instance: local-storage
        app.kubernetes.io/name: qgis-static-storage
name: qgis-static-storage# create the storage class resource on the k8s cluster
# you can observe that the storage class is global( without a namespace )
sabin@sabin-pc:~/map-service/k8s/storage$ kubectl apply -f qgis-static-storage.yamlStep 3
Create a physical volume backed by “worker-02” local storage to store Postgres data.
# postgres-qgis-data.yaml
apiVersion: v1
kind: PersistentVolume
metadata:
  labels:
    app.kubernetes.io/storage-class: qgis-static-storage
  name: postgres-qgis-data
spec:
  accessModes:
  - ReadWriteOnce
  capacity:
    storage: 45Gi
  local:
    path: /static-storage/postgres-qgis-data
  nodeAffinity:
    required:
      nodeSelectorTerms:
      - matchExpressions:
        - key: kubernetes.io/hostname
          operator: In
          values:
          - worker-02
  persistentVolumeReclaimPolicy: Retain
storageClassName: qgis-static-storagesabin@sabin-pc:~/map-service/k8s/storage$ kubectl apply -f postgres-qgis-data.yaml
sabin@sabin-pc:~/map-service/k8s/storage$ kubectl describe pv postgres-qgis-data
Name: postgres-qgis-data
Labels: app.kubernetes.io/storage-class=qgis-static-storage
Annotations: <none>
Finalizers: [kubernetes.io/pv-protection]
StorageClass: qgis-static-storage
Status: Available
Claim:
Reclaim Policy: Retain
Access Modes: RWO
VolumeMode: Filesystem
Capacity: 45Gi
Node Affinity:
Required Terms:
Term 0: kubernetes.io/hostname in [worker-02]
Message:
Source:
Type: LocalVolume (a persistent volume backed by local storage on a node)
Path: /static-storage/postgres-qgis-data
Events: <none>Step 4
At this step we will create an “opaque” secret configuration for the Postgres server and Postgres clients. After which we will create a statefulset for Postgres that will be scheduled on “worker-02” because we will reference the storage class that we initially defined. We will also need a service to access the server.
# secret-config.yaml
apiVersion: v1
kind: Secret
metadata:
  name: postgres-secret
type: Opaque
# please change the below setup
stringData:
  POSTGRES_DB: "db-data"
  POSTGRES_USER: "db-user"
  POSTGRES_PASSWORD: "db-password"
  PGDATA: "/dbdata"
  pg_service.conf: |
    [postgres_svc]
    host=postgres-primary
    port=5432
    dbname=db-data
    user=db-user
    password=db-password
sslmode=disable# create the k8s cluster secret resource
# observe the namespace "gis"
sabin@sabin-pc:~/map-service/k8s/database$ kubectl -n gis apply -f secret-config.yaml
# you could describe the resource
sabin@sabin-pc:~/map-service/k8s/database$ kubectl -n gis describe secret postgres-secret# postgres.yaml
kind: StatefulSet
metadata:
name: postgres-primary
spec:
replicas: 1
serviceName: postgres-primary
selector:
matchLabels:
myLabel: postgres-primary
template:
metadata:
labels:
myLabel: postgres-primary
spec:
containers:
- name: postgres-server
image: postgis/postgis
imagePullPolicy: IfNotPresent
ports:
- containerPort: 5432
env:
- name: POSTGRES_DB
valueFrom:
secretKeyRef:
name: postgres-secret
key: POSTGRES_DB
- name: POSTGRES_USER
valueFrom:
secretKeyRef:
name: postgres-secret
key: POSTGRES_USER
- name: POSTGRES_PASSWORD
valueFrom:
secretKeyRef:
name: postgres-secret
key: POSTGRES_PASSWORD
- name: PGDATA
valueFrom:
secretKeyRef:
name: postgres-secret
key: PGDATA
volumeMounts:
- name: data
mountPath: /dbdata
volumes:
- name: data
persistentVolumeClaim:
claimName: data
volumeClaimTemplates:
- metadata:
name: data
spec:
accessModes: [ "ReadWriteOnce" ]
resources:
requests:
storage: 25Gi
storageClassName: qgis-static-storage
---
apiVersion: v1
kind: Service
metadata:
name: postgres-primary
spec:
type: NodePort
selector:
myLabel: postgres-primary
ports:
- port: 5432
targetPort: 5432
nodePort: 31432# create the k8s cluster statefulset resource
sabin@sabin-pc:~/map-service/k8s/database$ kubectl -n gis apply -f qgis.yaml
# you should see the pod running
sabin@sabin-pc:~/map-service/k8s/database$ kubectl -n gis get pods
# test service connection
sabin@sabin-pc:~/map-service/k8s/database$ telnet 10.17.2.1 31432At this point we can load some geographical data into the created database. We chose OSM as our source. We will choose Romania’s map that we can convert with the help of osm2pgsql and upload it to our Postgres database. This is a very detailed map with 4 layers that will translate to 4 tables. You will not need always such a detailed map or you can define your one. Other regions can be found here.
# download your region of interest
sabin@sabin-pc:~/map-service/k8s/database$ wget https://download.geofabrik.de/europe/romania-latest.osm.bz2

sabin@sabin-pc:~/map-service/k8s/database$ bzip2 -d romania-latest.osm.bz2

# upload it to our configure database in the cluster
# through the configured NodePort of the service
# observe the configured database credentials at the previous step
sabin@sabin-pc:~/map-service/k8s/database$ osm2pgsql -c -d "db-data" -U "db-user" -H 10.17.2.1 -P 31432 -W romania-latest.osm
2023-11-08 09:26:37  osm2pgsql version 1.6.0
Password:
2023-11-08 09:26:43  Database version: 16.0 (Debian 16.0-1.pgdg110+1)
2023-11-08 09:26:43  PostGIS version: 3.4
2023-11-08 09:26:43  Setting up table 'planet_osm_point'
2023-11-08 09:26:44  Setting up table 'planet_osm_line'
2023-11-08 09:26:44  Setting up table 'planet_osm_polygon'
2023-11-08 09:26:45  Setting up table 'planet_osm_roads'
2023-11-08 09:33:28  Reading input files done in 403s (6m 43s).
2023-11-08 09:33:28    Processed 32642946 nodes in 42s - 777k/s
2023-11-08 09:33:28    Processed 3079863 ways in 286s (4m 46s) - 11k/s
2023-11-08 09:33:28    Processed 59876 relations in 75s (1m 15s) - 798/s
2023-11-08 09:33:46  Clustering table 'planet_osm_point' by geometry...
2023-11-08 09:33:46  Clustering table 'planet_osm_line' by geometry...
2023-11-08 09:33:46  Clustering table 'planet_osm_roads' by geometry...
2023-11-08 09:33:46  Clustering table 'planet_osm_polygon' by geometry...
2023-11-08 09:34:43  Creating geometry index on table 'planet_osm_roads'...
2023-11-08 09:34:45  Analyzing table 'planet_osm_roads'...
2023-11-08 09:34:51  Creating geometry index on table 'planet_osm_point'...
2023-11-08 09:35:09  Analyzing table 'planet_osm_point'...
2023-11-08 09:35:09  All postprocessing on table 'planet_osm_point' done in 83s (1m 23s).
2023-11-08 09:36:32  Creating geometry index on table 'planet_osm_line'...
2023-11-08 09:36:38  Analyzing table 'planet_osm_line'...
2023-11-08 09:36:38  All postprocessing on table 'planet_osm_line' done in 172s (2m 52s).
2023-11-08 09:36:51  Creating geometry index on table 'planet_osm_polygon'...
2023-11-08 09:36:57  Analyzing table 'planet_osm_polygon'...
2023-11-08 09:36:57  All postprocessing on table 'planet_osm_polygon' done in 191s (3m 11s).
2023-11-08 09:36:57  All postprocessing on table 'planet_osm_roads' done in 60s (1m 0s).
2023-11-08 09:36:57  osm2pgsql took 615s (10m 15s) overall.


# osm2pgsql doesn't create a primary key index so we will create it
sabin@sabin-pc:~/map-service/k8s/database$ kubectl -n gis exec -it postgres-primary-0 -- /bin/bash

root@postgres-primary-0:/# psql -U db-user db-data
psql (16.0 (Debian 16.0-1.pgdg110+1))
Type "help" for help.

db-data=# ALTER TABLE planet_osm_point ADD gid serial PRIMARY KEY;
db-data=# ALTER TABLE planet_osm_line ADD gid serial PRIMARY KEY;
db-data=# ALTER TABLE planet_osm_polygon ADD gid serial PRIMARY KEY;
db-data=# ALTER TABLE planet_osm_roads ADD gid serial PRIMARY KEY;
To test if everything is ok you can use QGIS Desktop. To manage several Postgres connections you can use service configurations for Windows or Linux.
[postgres_svc]
    host=10.17.2.1
    port=31432
    dbname=db-data
    user=db-user
    password=db-password
    sslmode=disable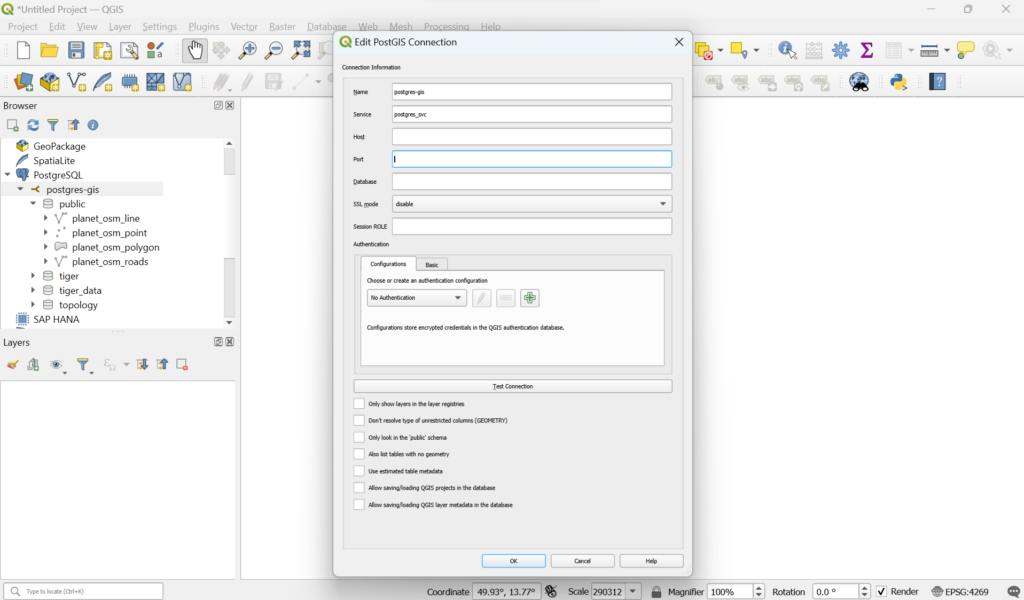
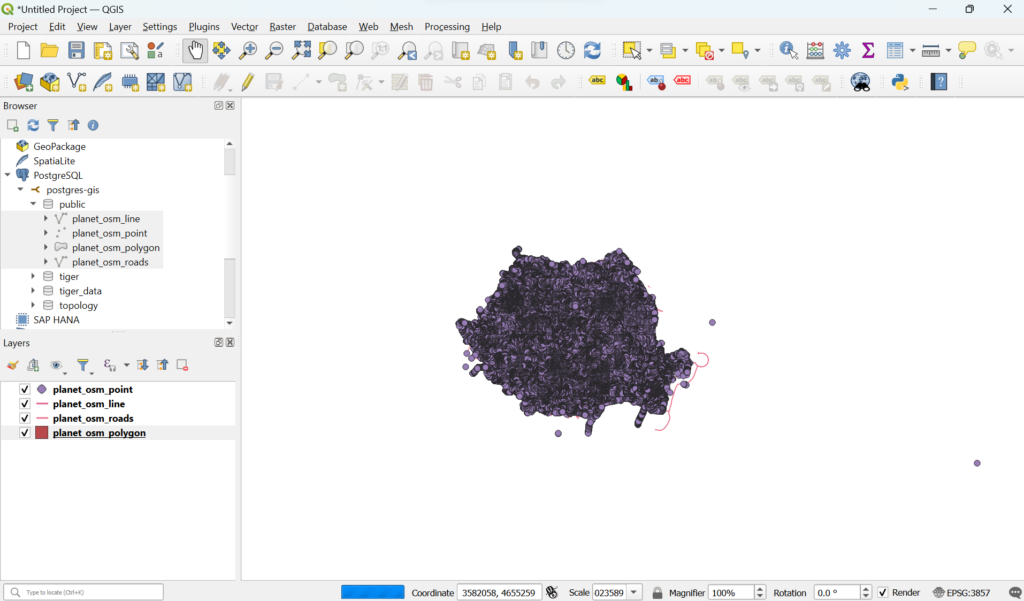
We can see now that QGIS Desktop can query the Postgres database and render the layers. But something is not right, it doesn’t look as the maps we are used to. This is because we don’t have any applied styles. We can apply styles to maps with the help of MultiQML plugin.
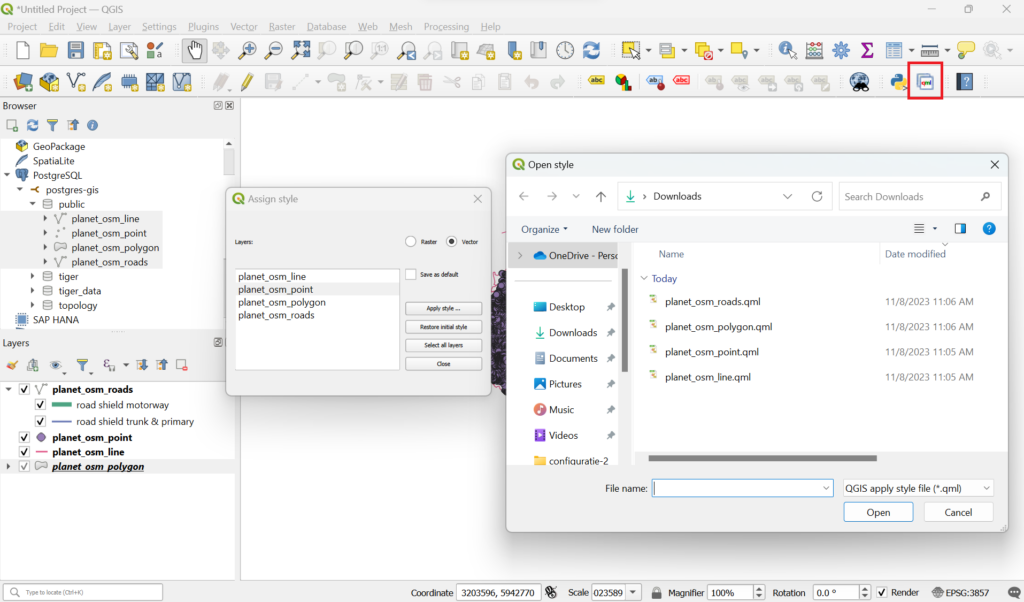
After you install MultiQML in QGIS Desktop, through the “Plugins” menu entry, you can apply some styles. I chose the styles from this repo which match the layers in our database.
The result should be a nice looking map similar to OSM maps or Google maps.
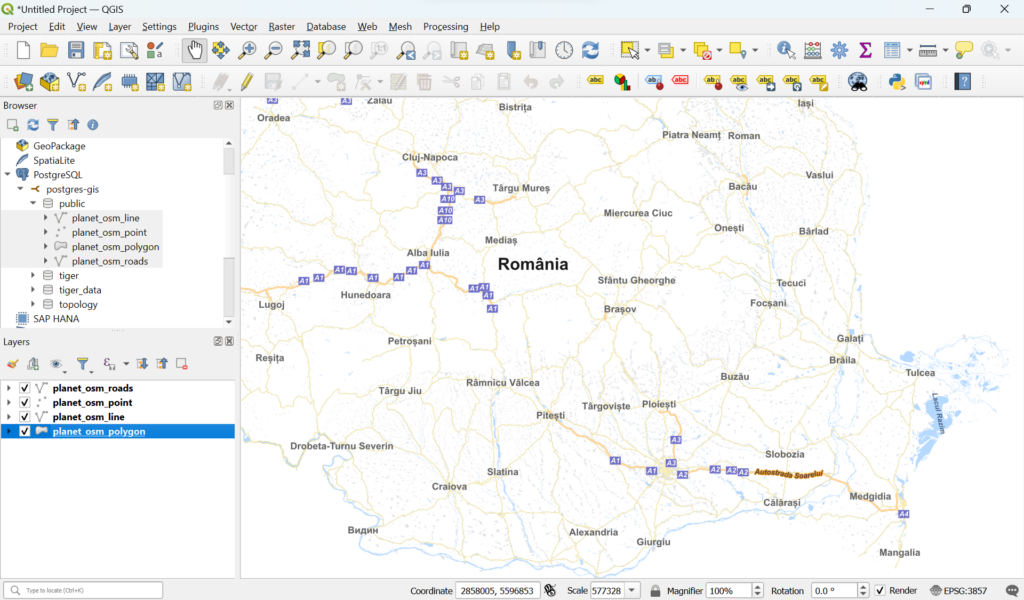
So far, we have a single instance of QGIS Desktop that connects to the Postgres database and uses a configuration file with styles to render the map. The next step is to have a WMS service that can split requests across multiple instances and render maps. Do not worry about the latency of rendering, we will address this when we will talk about caching. To move forward, we need to save the QGIS Desktop project to a “romania.qgs” file that will be used by the WMS service implemented by QGIS service.
Step 5
We will now configure the QGIS service that will handle WMS requests and return rendered tiles. This offloads processing to the server and leaves the image joining to the client which nowadays is often a browser.
apiVersion: apps/v1
kind: Deployment
metadata:
  name: qgis
spec:
  replicas: 3
  selector:
    matchLabels:
      myLabel: qgis
  template:
    metadata:
      labels:
        myLabel: qgis
    spec:
      containers:
        - name: qgis
          image: flobinsa/qgis-server:latest
          imagePullPolicy: IfNotPresent
          ports:
            - containerPort: 5555
            - containerPort: 8080
          env:
            - name: NGINX_ENABLE
              value: 'true'
            - name: QGIS_SERVER_PARALLEL_RENDERING
              value: 'true'
            - name: QGIS_SERVER_LOG_LEVEL
              value: '0'
          volumeMounts:
            - name: postgres-config-file
              mountPath: /etc/postgresql-common/
              readOnly: true
            - name: qgs-resources
              mountPath: /data
      volumes:
        - name: postgres-config-file
          secret:
            secretName: postgres-secret
            items:
              - key: pg_service.conf
                path: pg_service.conf
        - name: qgs-resources
          nfs:
            server: 10.18.0.2
            path: /nfs_data/qgs/qgs-resources
---
apiVersion: v1
kind: Service
metadata:
  name: qgis-service
spec:
  type: NodePort
  selector:
    myLabel: qgis
  ports:
    - name: "qgis-fcgi"
      port: 5555
      targetPort: 5555
      nodePort: 31080
    - name: "nginx-alt-http"
      port: 80
      targetPort: 8080
      nodePort: 32080
# We need to copy the generated project file from QGIS Desktop
# to the NFS server
sabin@sabin-pc:~/map-service/k8s/qgis$ scp romania.qgis nfsuser@10.18.0.2:/nfs_data/qgs/qgs-resources

sabin@sabin-pc:~/map-service/k8s/qgis$ kubectl -n gis apply -f qgis.yaml

sabin@sabin-pc:~/map-service/k8s/qgis$ kubectl -n gis get pods
NAME                        READY   STATUS    RESTARTS   AGE
postgres-primary-0          1/1     Running   0          4d10h
qgis-5df45ddbdb-5wkck       1/1     Running   0          1m
qgis-5df45ddbdb-vgmzq       1/1     Running   0          1m
qgis-5df45ddbdb-wzflq       1/1     Running   0          1m
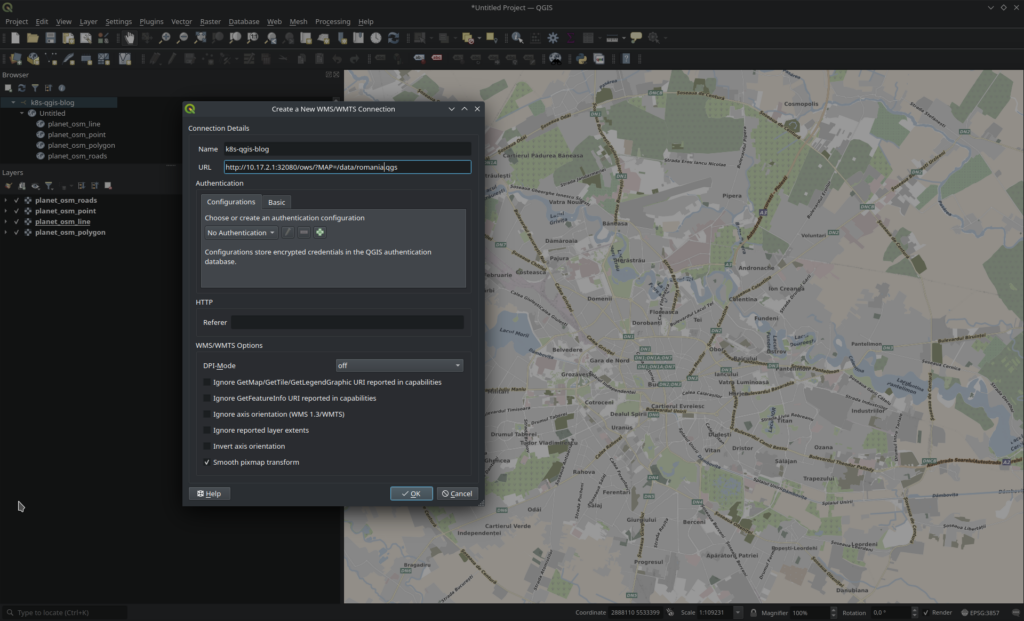
If you go back to QGIS Desktop and create a new WMS connection with the right URL http://worker-01:32080/ows/?MAP=/data/romania.qgs, you should see the same map as when querying the Postgres database.
Step 6
After we defined our qgis deployment we can browse the map and each time we modify the view we send a query to the cluster that is received by one of the qgis instances. The instance that received the request, connects to Postgres and queries the database for the extent that is requested and then it applies the styles from the “*.qgs” file. This is very slow. To improve this, we add a cache interface with the help of mapproxy. Mapproxy will store tiles resulted from the WMS queries and will serve them to subsequent requests.
To cache the map we have 2 options:
- use a client and browse the map at various levels in the regions of interest
- seed the cache with the help of mapproxy-seed utility
apiVersion: apps/v1
kind: Deployment
metadata:
  name: mapproxy
spec:
  replicas: 3
  selector:
    matchLabels:
      myLabel: mapproxy
  template:
    metadata:
      labels:
        myLabel: mapproxy
    spec:
      containers:
        - name: mapproxy
          image: flobinsa/mapproxy:latest
          imagePullPolicy: Always
          env:
            - name: QGIS_URL
              value: 'http://qgis-service/ows/?MAP=/data/romania.qgs'
          ports:
            - containerPort: 9090
          volumeMounts:
            - name: cache-data
              mountPath: /opt/mapproxy/cache_dir
      volumes:
        - name: cache-data
          nfs:
            server: 10.18.0.2
            path: /nfs_data/mapproxy
---
apiVersion: v1
kind: Service
metadata:
  name: mapproxy-service
spec:
  type: NodePort
  selector:
    myLabel: mapproxy
  ports:
    - port: 80
      targetPort: 9090
      nodePort: 30090
sabin@sabin-pc:~/map-service/k8s/mapproxy$ kubectl -n gis apply -f mapproxy.yaml

sabin@sabin-pc:~/map-service/k8s/qgis$ kubectl -n gis get pods
NAME                        READY   STATUS    RESTARTS   AGE
mapproxy-7cd8bbdd9b-7qggl   1/1     Running   0          2m
mapproxy-7cd8bbdd9b-gd7qn   1/1     Running   0          2m
mapproxy-7cd8bbdd9b-vrqmc   1/1     Running   0          2m
postgres-primary-0          1/1     Running   0          4d12h
qgis-5df45ddbdb-5wkck       1/1     Running   0          27h
qgis-5df45ddbdb-vgmzq       1/1     Running   0          27h
qgis-5df45ddbdb-wzflq       1/1     Running   0          27h

# Connect to one of the instances to seed the map.
# You can also seed the cache from a local computer using the NodePort
# The latter is preferred because you can use a greater concurency

mapproxy@mapproxy-7cd8bbdd9b-7qggl:/opt/mapproxy$ mapproxy-seed -f mapproxy.yaml --continue seed.yaml# seed example
# beware of inodes exhaustion, you should start small, with a city or smaller ROI
cleanups: {}
seeds:
all_seed:
caches: [all_cache]
coverages: [romania]
levels:
from: 0
to: 19
coverages:
romania:
bbox: [20.435274481, 49.358316310, 29.899295252, 42.337529387]
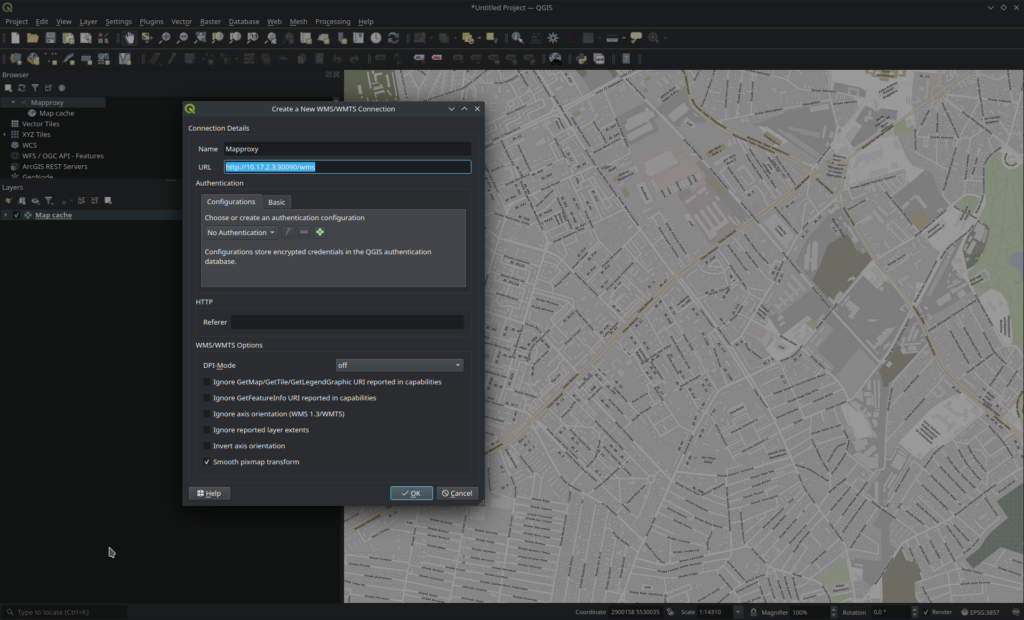
srs: 'EPSG:4326'If we go back to QGIS Desktop and add a new WMS service http://worker-01:30090/wms we can see the map loading faster than before.
Conclusions
This article presented the components for a mapping service that you can use for you applications. It started from a geographical database that was populated from an open source and defined a rendering, distributed engine( qgis ) and a caching component( mapproxy ).
Things to analyze and improve:
- security
- authentication
- restrict requests – big tiles can overload the system
- serve cache for background, use database for dynamic information
- request limiting per user
- benchmark your solution by recording and replaying a normal usage
- switch NFS to local storage where possible
- consider an ingress controller or a reverse proxy
